PVsyst is designed to be used by architects, engineer and researchers, and it is also a very useful pedagogical tool. Is one of the most popular pv planning software in the market.
It includes a detailed contextual Help, which explains in detail procedures and models used, and offers an ergonomic approach with guide in development of a project. PVsyst is able to import meteo data from many different sources, as well as personal data.
http://www.pvsyst.com/
Today's Example is a roof planning of 9.87 kWp using polycrystalline pv modules and 1 (one) triphased string inverter.
Step 1 Create sketch of the roof.

Step 2 Go to PVsyst - Import Meteo Data
It includes a detailed contextual Help, which explains in detail procedures and models used, and offers an ergonomic approach with guide in development of a project. PVsyst is able to import meteo data from many different sources, as well as personal data.
http://www.pvsyst.com/
Today's Example is a roof planning of 9.87 kWp using polycrystalline pv modules and 1 (one) triphased string inverter.
Step 1 Create sketch of the roof.

- Measure everything that can reduce system's performance
- Use the techical datasheets of the pv modules (Dimensions) and place the modules on your design.
- Choose the angle of the modules accoring your geographical place
- Make notes of the azimuth, around buildings (etc)
Step 2 Go to PVsyst - Import Meteo Data
- Import Meteo Data. Go to PVGIS Choose:

- Continent (Europe - Africa)
- Find Place (Coordinates GPS, Manually)
- Monthly Radiation
- Radiation Database: Climate SAF-PVGIS
- Calculate - From Browser ctrl+a and then ctrl+c
- Tools
- Meteo Database - import meteo data
- PV GIS (Europe - Africa) Monthly
- Location - Import
- Fix - Time Zone
- Save site
- Create Meteo

- Project design Grid Connected
- Project-Write plans info
- Site and Meteo - Country - Site Meteo file - Next
- Albedo - Monthly Values (Expert users)
- Common Values 0.2 (Urban) usual values from the table on the right
- Set high and low temprature - OK

Step 3 Near Shadings - Construct 3D Model
Step 4 PV System Planning
Good Luck! Please your comment is very important for us. If you know a better way for more reliable results please comment.
- Near Shading - Construction / Perspective
- Object - New - Elementary Shading Object
- Construct the 3D model based on the Sketch
- Object - PV plane in Sheds - Width - Length (Datasheet of the PV module) Place them - Pick them and Choose Partition in Module Chains and make your planning portrait or landscape
- Rotate whole scene (oriantation of the plan)
- Check your modules by performing Shadow animation over a day( Choose day of year - else relocate - When donne save and exit
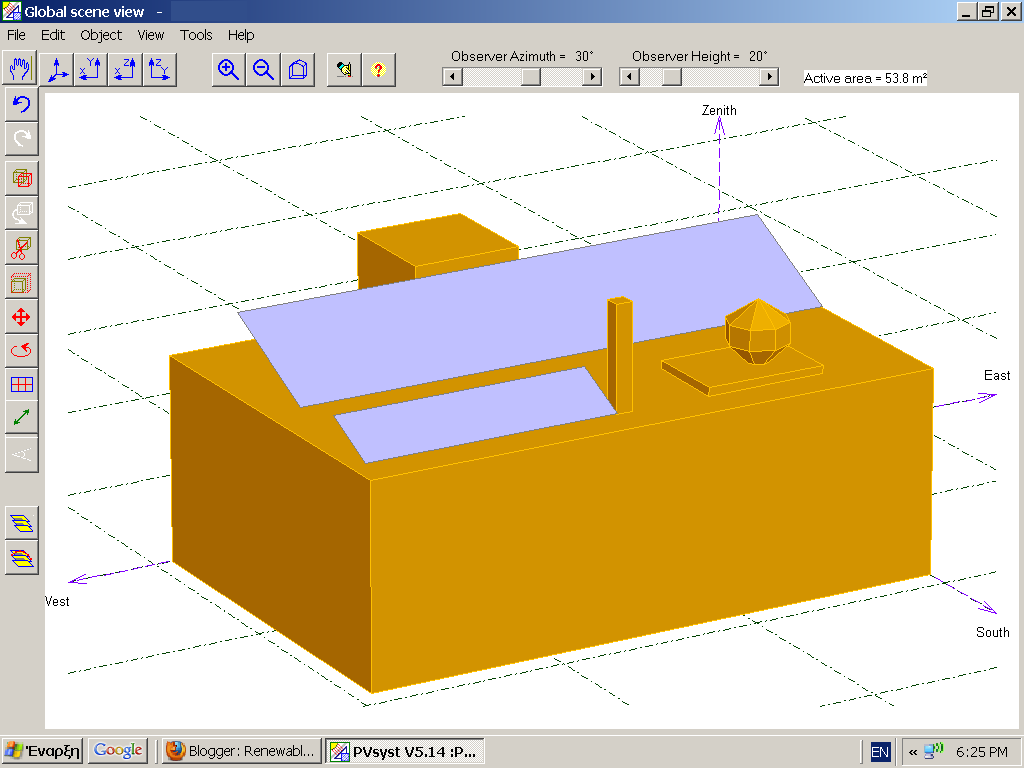
- Update Oriantation Parameters
- Use in Simulation - According to Module Strings - Module String Shading Factor - Table - OK

Step 4 PV System Planning
- System - Presizing Enter Planne Power
- Select Modules and Inverter
- Number of Modules and Strings
- Detailed Losses
- Field Thermal Loss factor
- Constant Loss Factor Uc (Roof - free Field)
- (Reocommended Free filed 29 W/m2/K and roof 15 W/m2/K)
- Wind loss factor 1,2 free and roof 0
- NOCT Factor
- Free field 45 C
- Roof 68 C
- Ohmic losses has to do with cablings (recommended 1%)
- Missmatch losses 2% and 4% (Without Flash report)
- OK
- OK

- Simulation
- OK Results
- Save
- Report
- See your iso-Shaing diagramm
- Produced Energy
- Performance Ratio

Good Luck! Please your comment is very important for us. If you know a better way for more reliable results please comment.
Great post! The step-by-step explanation of PVsyst modeling and system design is very informative for anyone involved in solar project planning. Accurate simulations, shading analysis, and performance calculations are essential for creating reliable PV plan sets and improving project outcomes. At PTOEdge, we appreciate content that helps solar professionals optimize system design and maximize energy production. Thanks for sharing this valuable guide!
ΑπάντησηΔιαγραφή